Ok so I’ve talked about a lot of subjects but the last two sprints I’ve been working heavily with AWS Lambdas. The cliff notes explanation is that they provide a way to split out more resource intensive tasks to Amazon’s infrastructure, launching as many instances as required to handle all the calls for as long as needed. Billing is based on how many calls there are as well as how long they run, and what memory allotment is chosen at setup. Higher memory allotments cost more for the same amount of time but also run on faster processors. There are quite a few scenarios for this, but the one that stuck out the most to me is automatically generating thumbnails for images uploaded to an s3 bucket. These uploads can come from a webpage, mobile app or satellite on the other side of the world. As the upload is finished the lambda can be set to automatically grab them and generate the thumbnails without requiring the uploading process to do it client side. Same final outcome, more responsive clients, so everyone wins. Incidentally, this example shouldn’t be taken as the most powerful way to use lambdas, it’s frankly about the simplest scenario. Here’s a couple other usages: Building an entire website from files on S3 and Lambdas. Filter logs from Cloudwatch sending out notifications via SNS automatically on events that need immediate response. Automate backup or cleanup processes to be run on a schedule or when certain events are noted in the logs. Automatically transition information between other AWS services like S3 and Kinesis (for streaming), and Redshift (data analysis). If there’s a way for one AWS service to tie into another, a lambda can automate it.
We’re going to jump ahead a bit, say you’ve found your task you want to convert to a lambda, but you don’t know how to get started on that. We’re going to focus on windows, but happily enough, most of these tools aren’t limited to that.
Setting up your environment
You’re going to need to install 3 prerequisites to get started: Docker, Python and the AWS command line interface.
- Docker: https://www.docker.com/docker-windows
Go ahead and create a Docker account and log in - Python 2.7.* or 3.6.*: https://www.python.org/downloads/
Make sure as you install it, you hit the checkbox to add Python to the path - AWS command line interface: https://aws.amazon.com/cli/
Docker will want you to reboot, but go ahead and get all 3 installed before you do so.
Once you’ve rebooted, opened docker and gotten logged in, visit the settings (right click on the tray icon) and go to Shared Drives and make sure the drive you work from is checked and hit apply. Here’s what it should look like:
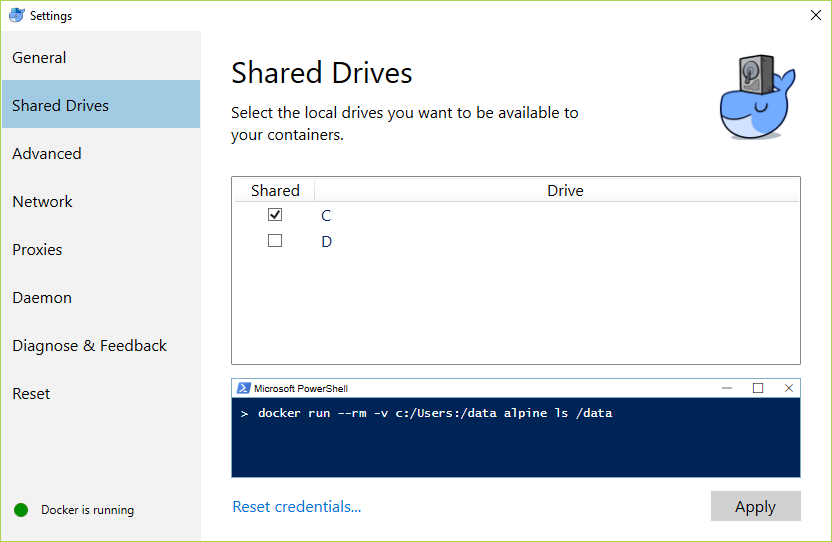
Now we get to the fun stuff, the quickest way to set up a project’s dependencies and perform the other tasks is with AWS SAM. Happily enough, there’s a python package that can be installed via the following command once python is installed:
pip install --user aws-sam-cli
Now you’ll need to manually add the SAM path to your environment variables, in windows 8 & 10 here’s the procedure:
- Hit the search next to your start button
- Search for “environment”
- Choose “Edit environment variables for your account”
- At the top, select Path and hit Edit
- Click new, then specify %appdata%\Python\Scripts
- Hit ok on this, then the previous window
At this point from a command prompt, type sam –version to verify it’s showing up in the path. You may need to log out and back in to make the above change show up.
Creating the project from a template
There are built in templates for both the basic project, the build tools and the tests all bundled together for a variety of runtimes (to see the whole list look for the runtime parameter after you type sam init –help). For the purposes of this I’m going to create a .net core 2.0 project named FirstLambda, to do so we’ll use the following command:
sam init --runtime dotnetcore2.0 --name FirstLambda
After that finishes, you should be able to go into the project directory and see a visual studio solution file as well as the source and test directories. There are also a handful of other files we’ll come back to, but for now, let’s open the solution file and check out what it’s put together for us:
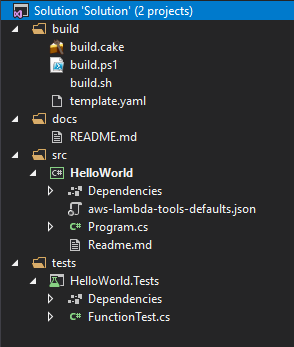
Both of those README.md are worth opening and reading but right off the bat I’d like to point out an oddity of the templates: though we specified a name, everything is still named HelloWorld. For the most part it doesn’t really matter, when we upload it we’ll choose the name that’s used to call the function. Still, I’m hoping someday they fix this. Besides the source and test project, template.yaml will be a file we tinker around with. Let’s go ahead and open Program.cs to see this example function.
There are two key things to note from this file, first of all a lambda only has one function that is accessible from outside. FunctionHandler takes two arguments, and that’s key, any data you want to send needs to be bundled up into that first parameter.
public APIGatewayProxyResponse FunctionHandler
       (APIGatewayProxyRequest apigProxyEvent, ILambdaContext context)
At this point I should probably mention, there’s two ways to call the lambdas, directly by replacing the APIGatewayProxyRequest/Response objects with your own objects. They will automatically get serialized or deserialized to json when the method is called. The other method sticks with the existing objects, letting you set it up to be called via https. This makes setting up the calls a little bit more complicated when being called from some languages, but easier in a more web-friendly environment.
Defining the services
Let’s move on to that template.yaml. That’s the service definition SAM uses for everything else. This one has some extra references in it because by default it’s set up for an API gateway, but the broad details are similar for either approach. We’re going to look at the resources section primarily, which comes after a short header defining some default properties for everything else.
Resources:
    HelloWorldFunction:
        Type: AWS::Serverless::Function
        Properties:
            CodeUri: src/HelloWorld/bin/Debug/netcoreapp2.0/publish
            Handler: HelloWorld::HelloWorld.Function::FunctionHandler
            Runtime: dotnetcore2.0
            Events:
                HelloWorld:
                    Type: Api
                    Properties:
                        Path: /hello
                        Method: get
I’ve bolded the most important parts for a basic lambda, the trailing bit has to do with using it as in an API Gateway, but the parts in bold, in some form or another need to be there for everything to work. The name of the function can change without changing other code, but the CodeUri and Handler are tied to the projects themselves. You can actually refer to a zip file that is a packaged version of the publish directory (more on that later) but for running it locally, it’s easier to leave it right where it puts it by default. The handler attribute tells it what actually gets called when the lambda is triggered, it is formatted as [assembly]::[namespace].[class]::[method]. Renaming the folder & project from HelloWorld would involve changing those two properties to match whatever the final name is. A key detail here is that there can be multiple function declarations in this block, they don’t have to be the same runtime either, just one it recognizes, a valid handler definition and a CodeUri (relative to the directory this file is in) that leads it to the handler. There’s actually a lot more about this particular syntax besides that, but I leave it up to the official documentation if you want to dig into those details. Next let’s look at the second half of the file…
Outputs:
    HelloWorldApi:
      Description: "API Gateway endpoint URL for Prod stage for Hello World function"
      Value: !Sub "https://${ServerlessRestApi}.execute-api.${AWS::Region}.amazonaws.com/Prod/hello/"

    HelloWorldFunction:
      Description: "Hello World Lambda Function ARN"
      Value: !GetAtt HelloWorldFunction.Arn

    HelloWorldFunctionIamRole:
      Description: "Implicit IAM Role created for Hello World function"
      Value: !GetAtt HelloWorldFunctionRole.Arn
This actually is an AWS cloudfront definition of the API gateway as well as some permissions and role definitions. If we’re using a pure lambda call, none of this is strictly necessary but it’s in the default so I figure I’ll point that out in case anyone else found themselves wondering why the link above doesn’t mention that. Now let’s actually look at what we need to do to launch the lambdas.
Now on to part 2, actually doing something with what we’ve learned.


