ASP.NET Web API

If last sprint’s two-part post threatened to drown you in acronyms, good news this one won’t be nearly as involved. This week marks my second sprint working on porting my Tic-Tac-Toe project to an ASP.Net Web API 2 project. It’s gone well, as a lot of the basic logic already exists in one form or another it’s mostly been a matter of figuring out which parts translate directly, and which need changed. Mostly it’s been making objects to represent db records, the classes to manipulate them and so many tests. Sooo many tests. coughs Where was I? Oh yes, for now I’ve been sticking with AWS DynamoDB as my persistent storage, though at a couple points I contemplated if I was to the point something a little more powerful might be useful, the simplicity of Dynamo has kept me where I’m at, also, the fact that I can set up the tables locally and not have to pester anyone while I’m experimenting doesn’t hurt.

At this point I’m up to three controllers: Board, PlayerRecord and Session. The PlayerRecord is a copy of the persistent player record from the original project, storing Wins, Losses and Ties with the player name as the key. You can look up, update or remove records via the controller and that’s about all there is to say about it.

The Session controller is a little bit fancier, it stores the state (won/tied/in progress), the name of the first and second players, and some metadata about when the session was started and last updated. As Dynamo doesn’t support auto-incrementing keys, I’ve got it keyed to a guid (stored as a string in the db after some trial and error). When you want to create a session, you pass it the player names as well as the size of the board (3×3 or 4×4). It responds with the new record as well as calling the Board’s data store functions to create a matching record in its table. Remove also eliminates the record from the board table.

The Board controller has all the standard get/update/remove operations, but the direct update as well as remove are in there only for me to make sure I’ve got solid test data (for now). Instead, to update it, the client is expected to call the RecordMove which accepts the Session guid, the index you want to change and what you want to change it to. If that cell isn’t open, it’ll reject it, if it is, it updates the record then runs it through a Lambda from a previous sprint to check if the board is finished, by a win or tie, or can continue. It updates Dynamo, then sends the record back.

That’s the gist of things, I’ve also been adding XML documentation this week in anticipation of getting to play with Swagger which I’m looking forward to. I got to work through the realization that two of my controller’s returns weren’t very consistent between the two (when to use http status codes, and how to return the data). I added logging this week as well.

There is one thing that I’ve been going back and forth on conceptually, if the Board and Session should be separated. At first, I thought “hey Dynamo won’t care if I slap an extra parameter into it with an array of cell states” but in the end I split them because if I ever decided to switch to a different backend, it might be a pain to change it. I also didn’t want to combine the controllers as it seemed like edging near a Single Responsibility Principle violation. I’ve contemplated a hybrid approach that stores them as a single table but works on them as if they were separate. Unless I split them back into separate return types before I return each which seems needlessly complicated. I’m almost certain that by the time I’m done, one of those will be partially or fully folded into the other, I just need to straighten out the kinks in the options before I try it.

That’s how it is as of this writing, but at this point the Sessions table seems like it hardly has a reason to exist and I’m not entirely happy that the Sessions database object also makes a call to the Board (at create and removal). I’ve got a suspicion that as I add complexity, I’ll regret this, but for this week I think I’ll let it stand. That brings us up to about today, if I’m able to get my PR merged without too much work, I’m hoping to fiddle a bit with Swagger to visualize my APIs a little better.
 

Invoking AWS Lambdas

In part 1 we installed dependencies, created the project from a template and generally got to poking around things. Now let’s get on to the less introductory stuff, building it, running it locally and invoking actual lambdas.

Building the project

If you used the project template, you’ll have several files that start with build. It’s a pre-configured copy of Cake Build and it works well (for C# projects at least). If you have the AWS Toolkit for Visual Studio installed you have a second option as well.

  • .\build.ps1 –target=package
    Run in powershell (or put powershell before the period) with the root of the template as the current directory, this will build both the test & lambda projects, run the tests and if that passes, package everything up in a zip file for easy upload to AWS.
  • dotnet-lambda package
    Does the same thing, minus running the tests and the dependency on powershell. This requires you to have

Running the lambda locally

Now that we’ve got a project compiled and the template.yaml definition we can finally launch a local copy of the lambda. Word of caution though, if you are expecting this to be faster than uploading it to AWS and running it from there then you may be in for a disappointment. With my simplest lambdas, running it locally only had a small performance hit. When I launched my lambda that called other lambdas into it, I saw performance of the lambda jump from 30-40 seconds at worst to 1.5-2.5 minutes. It did help me troubleshoot some errors though as well as do some testing without eating up too much of my limit for the AWS free tier. Ok disclaimer aside let’s get to the actual commands, both of these are run from the directory with the template.yaml.

  • Pure lambda:
    sam local start-lambda
  • API Gateway Lambda:
    sam local start-api

After a few seconds if it read your template correctly, it should tell you that you can invoke your lambdas and give you a URL. The default has both on local host with the pure lambda running on port 3001 and the api gateway on 3000.

Pointing your project at the local lambda

That last command was underwhelming after the build up, I admit I had a moment once I got there where I said “ok it didn’t fail, but is it actually working?” So now we need to figure out how to repoint a lambda call at the local instance. Let’s start with an basic example of how to create the lambda client object in C# because that’s where this change occurs:

var lambdaConfig = new AmazonLambdaConfig {
  RegionEndpoint = RegionEndpoint.USEast1
}
var lambdaClient = new AmazonLambdaClient("access-key","secret",lambdaConfig)

Now I should mention that the AmazonLambdaConfig properties are all read only, hence the syntax to initialize the region. Now let’s change that to point at the local lambda, say a pure lambda:

var lambdaConfig = new AmazonLambdaConfig {
  RegionEndpoint = RegionEndpoint.USEast1,
  ServiceUrl = "http://127.0.0.1:3001" // That url from the previous command
}
var lambdaClient = new AmazonLambdaClient("access-key","secret",lambdaConfig)

That’s it. That’s the only change to point your lambda at the local instance. If you were using api calls, you’d switch the port to 3000, but still, nothing else required. I personally use compiler directives to turn that line on and off based on project profiles to keep things simple.

Calling a lambda

I suppose we can’t make it this far without showing you how to call a lambda. I’m going to take a moment and share a wrapper function I use in C#, it is for calling pure lambdas, not ones behind an api gateway (though with some reworking the basics will still hold). I do have one additional NuGet package installed for Json serialization (Newtonsoft.Json)

public async Task<T> RunLambdaWithResult<T>(string functionName, object arguments)
{
  var response = await _lambdaClient.InvokeAsync(new InvokeRequest
  {
    FunctionName = functionName,
    Payload = JsonConvert.SerializeObject(arguments)
  });
  using (var streamReader = new StreamReader(response.Payload))
  {
    return JsonConvert.DeserializeObject<T>(streamReader.ReadToEnd());
  }
}

And one of my actual calls to this function looks like:

await _lambdaWrapper.RunLambdaWithResult<BoardStateResponse>("checkBoard",
  new BoardStateArguments {Board = ToList()});

The RunLambdaWithResult function flows pretty clearly for the most part, build an InvokeRequest with the function name & argument (as json string), invoke it and wait for the task to finish. The response though uses a MemoryStream as the returning payload, so we have to create a StreamReader to turn the MemoryStream back into something that the Json library can deserialize. From there it returns that to the calling function and it continues on, happily unaware of how it got from the argument to the result.

That about covers the major portions of my work with lambdas, skipping over the false starts, misunderstood instructions and general time wasting black holes I fell into along the way. It is by no means comprehensive, because I stuck with a single language, and avoided a lot of the additional frills beyond a passing mention.

Amazon Web Service Lambdas

Ok so I’ve talked about a lot of subjects but the last two sprints I’ve been working heavily with AWS Lambdas. The cliff notes explanation is that they provide a way to split out more resource intensive tasks to Amazon’s infrastructure, launching as many instances as required to handle all the calls for as long as needed. Billing is based on how many calls there are as well as how long they run, and what memory allotment is chosen at setup. Higher memory allotments cost more for the same amount of time but also run on faster processors. There are quite a few scenarios for this, but the one that stuck out the most to me is automatically generating thumbnails for images uploaded to an s3 bucket. These uploads can come from a webpage, mobile app or satellite on the other side of the world. As the upload is finished the lambda can be set to automatically grab them and generate the thumbnails without requiring the uploading process to do it client side. Same final outcome, more responsive clients, so everyone wins. Incidentally, this example shouldn’t be taken as the most powerful way to use lambdas, it’s frankly about the simplest scenario. Here’s a couple other usages: Building an entire website from files on S3 and Lambdas. Filter logs from Cloudwatch sending out notifications via SNS automatically on events that need immediate response. Automate backup or cleanup processes to be run on a schedule or when certain events are noted in the logs. Automatically transition information between other AWS services like S3 and Kinesis (for streaming), and Redshift (data analysis). If there’s a way for one AWS service to tie into another, a lambda can automate it.

We’re going to jump ahead a bit, say you’ve found your task you want to convert to a lambda, but you don’t know how to get started on that. We’re going to focus on windows, but happily enough, most of these tools aren’t limited to that.

Setting up your environment

You’re going to need to install 3 prerequisites to get started: Docker, Python and the AWS command line interface.

Docker will want you to reboot, but go ahead and get all 3 installed before you do so.

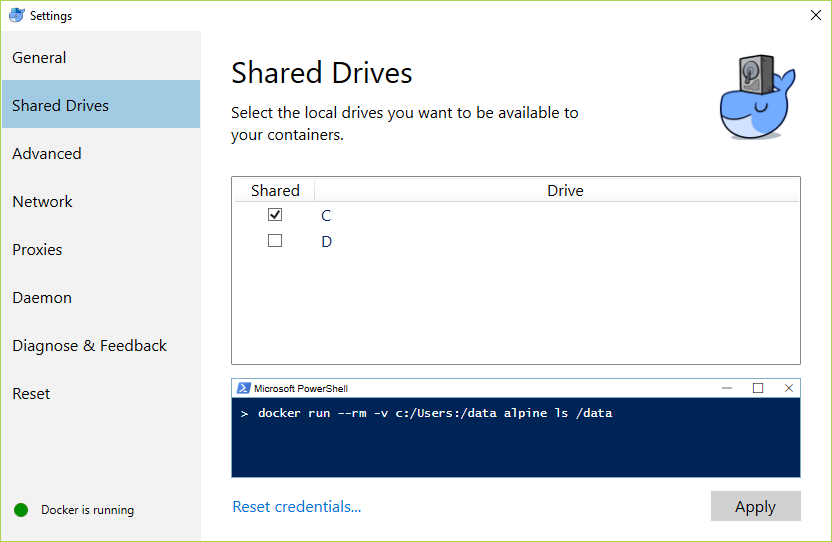
Once you’ve rebooted, opened docker and gotten logged in, visit the settings (right click on the tray icon) and go to Shared Drives and make sure the drive you work from is checked and hit apply. Here’s what it should look like:
docker-shared

Now we get to the fun stuff, the quickest way to set up a project’s dependencies and perform the other tasks is with AWS SAM. Happily enough, there’s a python package that can be installed via the following command once python is installed:

pip install --user aws-sam-cli

Now you’ll need to manually add the SAM path to your environment variables, in windows 8 & 10 here’s the procedure:

  1. Hit the search next to your start button
  2. Search for “environment”
  3. Choose “Edit environment variables for your account”
  4. At the top, select Path and hit Edit
  5. Click new, then specify %appdata%\Python\Scripts
  6. Hit ok on this, then the previous window

At this point from a command prompt, type sam –version to verify it’s showing up in the path. You may need to log out and back in to make the above change show up.

Creating the project from a template

There are built in templates for both the basic project, the build tools and the tests all bundled together for a variety of runtimes (to see the whole list look for the runtime parameter after you type sam init –help). For the purposes of this I’m going to create a .net core 2.0 project named FirstLambda, to do so we’ll use the following command:

sam init --runtime dotnetcore2.0 --name FirstLambda

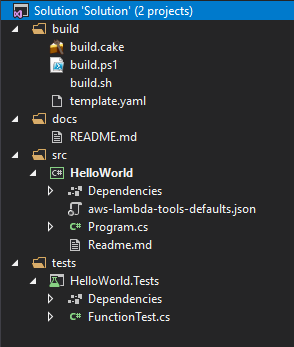
After that finishes, you should be able to go into the project directory and see a visual studio solution file as well as the source and test directories. There are also a handful of other files we’ll come back to, but for now, let’s open the solution file and check out what it’s put together for us:
project-files

Both of those README.md are worth opening and reading but right off the bat I’d like to point out an oddity of the templates: though we specified a name, everything is still named HelloWorld. For the most part it doesn’t really matter, when we upload it we’ll choose the name that’s used to call the function. Still, I’m hoping someday they fix this. Besides the source and test project, template.yaml will be a file we tinker around with. Let’s go ahead and open Program.cs to see this example function.

There are two key things to note from this file, first of all a lambda only has one function that is accessible from outside. FunctionHandler takes two arguments, and that’s key, any data you want to send needs to be bundled up into that first parameter.

public APIGatewayProxyResponse FunctionHandler
       (APIGatewayProxyRequest apigProxyEvent, ILambdaContext context)

At this point I should probably mention, there’s two ways to call the lambdas, directly by replacing the APIGatewayProxyRequest/Response objects with your own objects. They will automatically get serialized or deserialized to json when the method is called. The other method sticks with the existing objects, letting you set it up to be called via https. This makes setting up the calls a little bit more complicated when being called from some languages, but easier in a more web-friendly environment.

Defining the services

Let’s move on to that template.yaml. That’s the service definition SAM uses for everything else. This one has some extra references in it because by default it’s set up for an API gateway, but the broad details are similar for either approach. We’re going to look at the resources section primarily, which comes after a short header defining some default properties for everything else.

Resources:
    HelloWorldFunction:
        Type: AWS::Serverless::Function
        Properties:
            CodeUri: src/HelloWorld/bin/Debug/netcoreapp2.0/publish
            Handler: HelloWorld::HelloWorld.Function::FunctionHandler
            Runtime: dotnetcore2.0
            Events:
                HelloWorld:
                    Type: Api
                    Properties:
                        Path: /hello
                        Method: get

I’ve bolded the most important parts for a basic lambda, the trailing bit has to do with using it as in an API Gateway, but the parts in bold, in some form or another need to be there for everything to work. The name of the function can change without changing other code, but the CodeUri and Handler are tied to the projects themselves. You can actually refer to a zip file that is a packaged version of the publish directory (more on that later) but for running it locally, it’s easier to leave it right where it puts it by default. The handler attribute tells it what actually gets called when the lambda is triggered, it is formatted as [assembly]::[namespace].[class]::[method]. Renaming the folder & project from HelloWorld would involve changing those two properties to match whatever the final name is. A key detail here is that there can be multiple function declarations in this block, they don’t have to be the same runtime either, just one it recognizes, a valid handler definition and a CodeUri (relative to the directory this file is in) that leads it to the handler. There’s actually a lot more about this particular syntax besides that, but I leave it up to the official documentation if you want to dig into those details. Next let’s look at the second half of the file…

Outputs:
    HelloWorldApi:
      Description: "API Gateway endpoint URL for Prod stage for Hello World function"
      Value: !Sub "https://${ServerlessRestApi}.execute-api.${AWS::Region}.amazonaws.com/Prod/hello/"

    HelloWorldFunction:
      Description: "Hello World Lambda Function ARN"
      Value: !GetAtt HelloWorldFunction.Arn

    HelloWorldFunctionIamRole:
      Description: "Implicit IAM Role created for Hello World function"
      Value: !GetAtt HelloWorldFunctionRole.Arn

This actually is an AWS cloudfront definition of the API gateway as well as some permissions and role definitions. If we’re using a pure lambda call, none of this is strictly necessary but it’s in the default so I figure I’ll point that out in case anyone else found themselves wondering why the link above doesn’t mention that. Now let’s actually look at what we need to do to launch the lambdas.

Now on to part 2, actually doing something with what we’ve learned.

A C# programmer in King Python’s Court

If you’ve been reading my recent blog posts you may be expecting a long, highly technical post. Good news, this week it’s more of a longish summary than an epic technical manual (or bad news for those who seek out new long technical posts as entertainment, you lunatics you 🙂 ) My tasks this week with the biggest unknowns have actually been code katas in languages I’m unfamiliar with, rather than the previous weeks refactoring fun.

Poker Hand Ranking

The first was to work through a poker hand ranking algorithm in Python. Starting with a set of written out rules for ranking hands and using a set of test data from CodeWars, I had to take a hand, parse them into something usable, then compare two of them to see which one would win. Though my recent background is more C# or Python, I’ve previously supported a python application so I didn’t actually expect it to give me too much more trouble than getting a developing environment set up and hammering out some rules about flushes, straights, and so forth. I had no problems with the IDE, created the project…. and sat there making small false start after false start. It was intensely frustrating as I can read already written Python well enough as it roughly resembles Basic with obsessive indentation being used to group statements instead of keywords like End If, End For, etc. Writing it from scratch though with an unfamiliar algorithm though just wasn’t working. So as a way to get my feet under me I retreated to my familiar C#, hammered out a frankly horrible looking implementation of the algorithm. Some clean up later so it was easier for me to read and I returned to Python, equipped with a basic set of tasks that I knew I had to understand well enough to translate it. Mostly basic stuff like defining classes, iterating arrays. Along the way being reminded of switch statements are great (Python doesn’t have them) when I had to chain together if and else-if statements. Adding new sets of tests as I defined each basic component so I could verify that I was getting what I expected from the alterations I was making to suit. Even then I can’t say the translation worked flawlessly or with minimal reworking, I used a few LINQ statements in the c# version that initially in my ignorance I failed to translate in the cleanest fashion. Mostly though it was a lot of trips back and forth to the Python documentation and restructuring logic until I got it working. On to the next code kata I went…

Wonderland Number in F#

To quickly summarize this one, my task was to calculate a 6 digit number that didn’t repeat any digits and could be multiplied by 2-6 and the resulting number was the same length and has the same digits, just likely in a different order. Oh and I was to do it in F# which is Microsoft’s answer to the Functional Language paradigm that I wrote about last week. I was certain this one would be a breeze as well to get set up for, the kata comes with tests pre-defined, in theory all I had to do was load it up into Visual Studio and figure out what to put into the empty function declaration. None of it worked, and after some discussion with Kris, I ended up recreating it in a new project and learning how to write the tests in a way that VS actually would compile and run. From there I had a dim idea how to proceed, but inspiration as it happened tripped me up. I realized one night on a walk that I could eliminate all but 100,000 of my 6 digit number set before I wrote a line of code. The reasoning was sound and so I started looking for ways to filter the initial sequence down (eliminating numbers with duplicated digits). This in mind I ran headlong into places that my simplistic understanding of F# couldn’t quite solve, but could come close. I spent a couple hours trying to figure out how to rewrite how I’d picture doing it in other languages to work in F#, array shuffling, iteration, permutations and other “fun” half-visualized plans. In the end, I realized that the step I had intended to take once I had this part done was actually the only step I needed in the first place. I then finished it in 5 minutes, and spent the next 15 poking it trying to make it break because surely it couldn’t be that easy.

That’s the two main tasks I worked on this week, in terms of keeping things simple I definitely had some false starts, but so far a successful sprint. Incidentally, this exposure to F# is already helping me follow some walkthroughs on angular better than I did previously. Specifically the using other operators to chain calls together instead of parentheses.

Functional Programming

Functional programming, or fp, is a method of composing software out of pure functions, eliminating side effects caused by shared states and mutable data. Using a declarative syntax instead of imperative and chains of pure functions instead of various functions accessing and modifying shared states. Man that’s a lot of computer science terms for one sentence, let’s see if we can translate that into something a little easier to follow. Let’s start with the one that is the umbrella over most of them…

Side Effects

A side effect is defined as any application state change that is observable outside the function other than it’s return value. What this means for the actual code is that if you pass the same data to the same function (or series of functions), you will always get the same result.

Pure Functions

A function is said to be pure if there is no chance of any side effects on it, or caused by it. Mathematical equations make excellent examples of this, we can define Add(A,B)=A+B. If we pass 2 and 3 to it, the answer will always be 5. Defining Multiply, Subtract and Divide similarly, you can chain them together to more complex operations knowing at each step that the outcomes will always be the same.  Graphing functions are a fun example:

LineSlope(Rise,Run)=Divide(Rise,Run)
LinearEquation(X, Slope, YIntercept)=Add(Multiply(Slope,X),YIntercept)

Having tested Divide, Add and Multiply, we know that LinearEquation(1, LineSlope(2,4), 5) will return 5.5 no matter how many times in a row we call it. Note too that I passed a function as an argument to LinearEquation, that’s because being pure it supports higher order functions, which simply means that anywhere we would pass data, we can pass a function that will get evaluated when it’s results are needed. We can take this to crazy depths with polynomial functions:

Poly(x,Coefficient,Power,ExtraTerm)=
  Add(Multiply(Coefficient,RaiseToPower(x,Power)),ExtraTerm)

Two degree polynomial: Y=2x2+3x-4 becomes Poly(x,2,2, Poly(x,3,1,-4). We’re but an array operation away from being able to build a variable degree polynomial function!

Shared States

One of the quickest ways to make an object impure is to define an internal state that can affect how it’s functions return values. The Random class in .Net is an excellent example of this. Calling New Random().Next over and over will return different numbers each time because at each call a hidden state gets modified slightly. Besides allowing incredibly impure functions, there’s one other concept this causes problems for…

Immutable Data

As mentioned previously, pure functions when provided with the same input always have the same output. This however isn’t just a choice while coding, this is enforced by the language. Values or parameters, once defined are immutable, or unable to be changed. This also means that anything that is passed those same parameters is assured that they won’t be modified by a previous call.

Tying it all together

Reading through all these, there’s a lot that works together, functions being passed as arguments works well because arguments can’t be changed once defined anyway. Immutable data means that even if you did set up a shared state, it is easier to work without it, and less likely to have bugs. All of these things together make writing anything but pure functions more difficult in the languages than just writing it in easy to test pure chunks of logic. So we’ve talked about functional programming and key areas it differers from more commonly used paradigms, but beyond “easier testing” we’ve yet to really plug any specific problems it has the advantage in or areas that it’s not the best way to handle things.

First let’s talk about tasks that benefit from fp. These are typically tasks that would see a performance boost from some level of multithreading or distributed computing. Problems that involve translating from one vocabulary to easier to process intermediary forms (such as parsing natural language queries or compiling code).

Next we’ve got tasks that are likely to run worse with fp, most of these revolves around tasks that will need to extract every bit of performance from the hardware or can’t easily be abstracted into smaller chunks. An operating system would not be ideal due to the additional resources and delay that an fp solution would induce. GUIs also tend to be less responsive for similar reasons.

Last we have the tasks that neither benefit, nor are harmed by a functional approach. Most tasks actually fall in this category, leaving such decisions up to policy and what the developers are most comfortable maintaining.

Example time

Now that we’ve walked through all the terms, let’s look at an example. We want to take an array of integers, multiply each by 3 and return the sum. In C# that might look like the following:

int SumTriple(int[] array) {
  var accumulator=0;
  for(var i=0; i<array.Length; i++) {
    accumulator += array[i]*3;
  }
  return accumulator;
}

That function has one actual line of work, that’s surrounded by an extra 4 lines dedicated to flow control and bookkeeping. Now let’s see one possible way to do it in F#

let triple a = a*3 
let SumTriple a =
  a |> List.map triple |> List.sum

As you can see, we let all of the loop and accumulate be handled by built in functions. It’s an odd syntax that uses |> instead of additional parentheses, in a language that uses parentheses more it could be written the following way: List.sum(List.map(a, triple)). In fact you can duplicate something similar with .NET LINQ statements, again in C# taking full advantage of LINQ:

int Triple(int a) => a*3;
int SumTriple(int[] array) =>
  array.Select(Triple).Sum();

Both LINQ Select and List.map take an array of some form and apply a function to each item, then return the result as a new array. Then List.sum and LINQ Sum reduce the arrays to a single final value which is returned.

Now let’s go back to that original definition: functional programming is a method of composing software out of pure functions, eliminating side effects caused by shared states and mutable data. Hopefully, now that we’ve made it through all the definitions and the example, that sentence feels less like Star Trek technobabble.

Object Composition

Object composition is defined as the methods used when combining simple objects or data types into more complex ones. As definitions go, this is sufficient for Wikipedia, but it doesn’t really tell us much. It’s a topic I am trying to be more deliberate about, in my previous experiences the only developer who read my code was me. Writing code in a way that others who follow can easily understand is something that every book I’ve read in the apprenticeship has justifiably hit on. In my development I keep coming back to these lessons and so this week, I’m going to try to condense several books worth of little details into a compact walkthrough, and maybe it’ll be useful to you as well.

Where do we start?

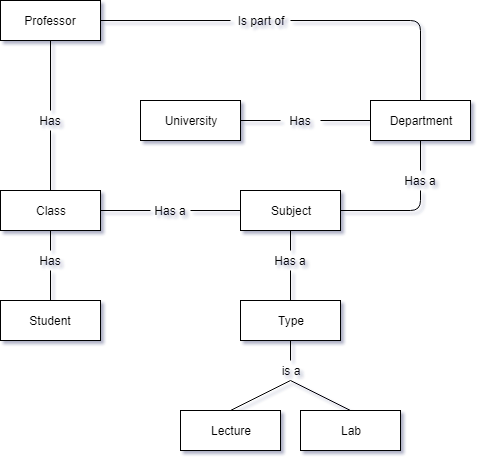
One of the suggestions I keep seeing for both checking for SRP violations and identifying relationships is to describe your objects and how two related ones work in the simplest sentences you can. For relationships specifically you may find yourself coming up with sentences like “a Child is part of a Family”, “a Tesla is a Car” or “a Department has a University”. The key for this stage is to leave out anything that isn’t one of the objects and the connection as you’d write it, thinking in terms of a child being connected to a parent (if you think in terms of “part of a” or “is a”, “has a” it’s easier but not required). If you’re not sure what the parent should be then the first question to ask is which object is the more generic form, or makes sense to “own” the other? That’s going to be your parent object. Once you’ve broken it down into these sentences, now you’ve got to start translating them into actual designs, which fall into three main types:

Composite Relationship (or “has a”)

The simplest relationship, composite objects typically have a clearly defined parent object such as in our examples a department can hardly be called the parent of a university. With a composite object, the child object doesn’t have a reason to exist without the parent. Consider the university example, creating a Department without having University doesn’t work. Note that the reverse doesn’t have to be true, a University can be created without Departments being defined and the exact list of Departments can change without creating a new University.

Aggregate relationship (or “part of a”)

Next we have aggregates which vary from composites in the lifespan of the child. If the child can exist without being associated with a parent, especially if it can outlast the disposing of the parent, it’s an aggregate. In case you’re not already thinking it, a real life parent/child relationship neatly fits this definition, perhaps they can’t be created without parents but them losing that association doesn’t cause them to cease to exist (did I just reduce human reproduction to a factory object in my head? Possibly) Other than when the child objects are created and destroyed, there may be little difference between this and composite relationships in implementation.

Inheritance (or “is a”)

Last, and trickiest we have Inheritance. The parent is the most generic or basic description of what the hierarchy does, and the children define difference that aren’t shared by all the siblings. This can be costly to fix if you misuse so typically it’s recommended to avoid this unless nothing else makes sense. In fact a common symptom of misusing this is having to modify the parent object when adding a new child object. Even if it is the best option then the ideal way to do it is with a shallow hierarchy, avoiding editing the parent class as well as creating a large number child classes.

A Detailed Example

We’re tasked with creating an entire university course catalog and class schedules in an object-oriented fashion, this includes professors, students, departments and classes. Starting at the top, we know we’re going to have objects representing the University, Departments, Professors, Classes, and Students. We also know that some classes are instruction only and some have labs, and no, this isn’t every relationship, just some key ones.

  • A Department has a University
    The Department doesn’t exist without the University making this a Composite relationship
  • A Professor is part of at least one Department
    Professors don’t cease to exist if the Department closes, nor are they for sure limited to one department, making this an Aggregate relationship
  • A Class has a Professor
    I’d define this as Composite as a class doesn’t exist without a professor assigned to it.
  • Students are part of multiple Classes
    This sentence is a bit tricky because you could swap the parent & child without making it easier to pin down. This made me wonder if there’s an object that our original definition left out and sure enough, we saw the specific instance of a Class as the same as the Class itself. So, we add a Subject object to represent the description and department that you’d see in a course catalog, and change Class to describe the specific instance of a Subject that is attended by Students.
  • Continuing, we’re going to make an assumption that in real life we would want to run past the customer: A Course is either a lab or lecture environment, never both.
    • A Lab Class/Subject is a Class/Subject
    • A Lecture Class/Subject is a Class/Subject
      This certainly looks like inheritance, but because not confident of of my understanding let’s not bake it into the Class or Subject objects, but instead turn a type enum into classes that define the behavior differences. This reduces the consequence of being wrong while still allowing the lecture and lab types filter allowed rooms based on their equipment and workspace requirements.

Our diagram at this point looks like this:

ERD Example

One final point to make is that I’ve had relationships that I couldn’t pin down that I traced back to object names that simply were not descriptive enough. Fixing the name, made the relationship far easier to define.

Microsoft Dependency Injection

Ok so to review a bit of the last post: we talked about the design decisions and principles that go into Dependency Injection. Separating the task of constructing the dependencies from using them was a key component. This can lead to a chicken-and-egg like problem: If it’s not the parent object’s job to construct the dependency, and it’s not the grandparent job to make it then who actually constructs the dependency? That defines the problem, let’s look at one possible solution, a library from Microsoft available on NuGet as Microsoft.Extensions.DependencyInjection.

Before we get to the problem though, let’s lay out the scenario. Say I was tasked with building the control systems for an automated factory that focuses on one model of car. For our purposes I’m assuming I’ve split the part inventories into 3 groups: engine parts, body or frame parts and finishing parts (trim, seats, etc), not terribly realistic but it keeps the examples short. With parts from these 3 lists, the factory can assemble cars. Before looking into dependency injection I might have created and populated these lists inside the factory’s constructor. As we talked about previously, this would be a pain to test and leave the factory too tightly coupled to them to adapt to changes. Now though, I look at it and decide to implement constructor injection to outsource the dependency injection:

class CarFactory {
    public CarFactory(IEngineInventory engineInventory, 
        IFrameInventory frameInventory, 
        IFinishingInventory finishingInventory)
    {..}
    public BuildCars()

It doesn’t look bad, and easy to drop in mock objects for testing, but we’re back to creating those inventory objects in Program.Main manually:

Program.Main() {
    var engineInventory    = new EngineInventory();
    var frameInventory     = new FrameInventory();
    var finishingInventory = new FinishingInventory();
    var factory = new CarFactory(engineInventory, frameInventory, 
        finishingInventory);
    factory.BuildCars();
}

That looks a little clunky, any changes to the objects mean we’re making changes to Program.Main which is difficult to test outside of production. We could wrap in it’s own object that creates all the items, but then we’ve just made that class tightly coupled to all of them? We don’t want that, nor do we want to create them inside Program.Main.

In comes Microsoft’s DependencyInjection library (which I’ll refer to as ms-di). It lets you define a list of concrete implementation types to return when asked for something that fulfills an interface’s requirements. What’s even fancier, is that if that object’s constructor references something it already knows about, it can automatically populate the constructor as well! Before I give you an example, I should mention, that what I’ve been calling objects or dependencies, it calls services:

Program.Main() {
    // First: create & populate the collection of service definitions
    var serviceList = new ServiceCollection();
    serviceList.AddSingleton<IEngineInventory,EngineInventory>();
    serviceList.AddSingleton<IFrameInventory,FrameInventory>();
    serviceList.AddSingleton<IFinishingInventory,FinishingInventory>();
    serviceList.AddSingleton<IVehicleFactory,CarFactory>();

    // Second: build an object to provide instances of those services
    var provider= serviceList.BuildServiceProvider();
    var factory = provider.GetService<IVehicleFactory>();
    factory.BuildCars();
}

That still leaves the service definitions in Program.Main, which seemed like too much low-level awareness at such a level. After some discussion with my mentors I discovered that ASP.Net has a convention where a Startup class is used to encapsulate such details in a common style. I like that idea and I swiped it, leaving me creating a Startup that creates the ServiceCollection fully configured that I call from Program.Main, then continue with the rest.

Another detail, for my example I’m using a single type of Add method for the service collection. There are 3 available when used in a console project that are based on the lifetime of the object. ASP.Net provides other Add methods, which relate more to how the object will be used, but the ones available for this purpose are:

  • AddSingleton – It creates one instance then returns that each time
  • AddTransient – Every time you request one, it returns a new instance
  • AddScoped – You can create a scope (see below), in which all scoped services act like singletons (without changing transient behavior). Outside that scope though, it recreates the services.

Defining a custom scope is fairly easy, ServiceProvider.CreateScope() returns an object that has a new copy of the ServiceProvider in it. Once you are finished with it, you can easily dispose of it, and create a new scope for another section of the code.

One additional note, it’s possible to pass delegates to all of the ServiceCollection.Add methods, as long as the delegate returns the type in question so it can figure out how to use it. Every usage of this I’ve explored has ended up refactored away as I understood how to use it better, but the capability is there.

So how does this help me maintain it?

In our scenario, once finished we have a factory up and going, say in the US somewhere. Then we decide to expand to another country, such as Japan. Accounting and inventory tracking requirements there may be different enough that we can’t use our existing inventory implementations. Not to worry, we can add a set of inventory objects targeted at Japan. If you’ve kept your coupling down to what’s absolutely necessary, all you need to do from there is change the service collection definitions to JapanEngineInventory, JapanFrameInventory and JapanFinishingInventory and retest.

Things you may try that won’t work (with alternatives)

  • Pass something to GetService to use to pick which implementation of an interface to return.
    • Building from the example, let’s say we don’t just have a CarFactory that inherits from IVehicleFactory but also a TruckFactory. I can add AddSingleton<IVehicleFactory,TruckFactory>() but GetService doesn’t accept arguments to pick which one returns (it always returns the last, yeah I tried this).
    • If you actually want to do this, then you need to wrap the subclasses in their own (possibly empty) interfaces, TruckFactory inerits from ILargeVehicleFactory which inherits from IVehicleFactory and similarly through CarFactory via ISmallVehicleFactory. Then you can add the ILargeVehicleFactory and ISmallVehicleFactory to the service collection and use those in the code.
  • Edit the service definitions on the fly and have your ServiceProvider see the changes
    • It doesn’t work. It shouldn’t work. Define your services higher up so you don’t even need to consider this. If you find a way to do this, and actually use it in real code, you’re a bad person. I say this having found a way to somewhat get around this. The code was unintelligible, the “code smell” was that of a landfill on week 2 of being on fire. I deleted my experiment and told myself to forget anything more than: don’t do it.

Dependency Inversion & You

The principles of Dependency Inversion provide excellent ways to streamline and test code changes, encouraging behavior that reduces the risks of unintended consequences when later maintained. Combined with a thorough set of tests this can stave off “code-rot” by improving the readability greatly.

The Dependency Inversion Principle (DIP) has two parts.

  1. High level objects should not depend on low level objects, any reference between them should be to abstractions.
  2. Those abstractions should not depend on details. Rather the details should depend on the abstractions

While in C# you could easily replace the name “abstraction” with “interface”, this isn’t intended to be applied purely at the object level, abstraction could refer to the overall design before you get even so far as writing even interfaces. Even with those interfaces we shouldn’t directly pass through every single property or method but instead look at what is absolutely needed by the parent object to perform the task. Including too much detail couples the classes together too tightly, making swapping one implementation out for another very involved.

Another parallel concept that brings something to the mix is Inversion of Control (IoC). Like DIP this can be applied both at higher level and lower level as you’re implementing. Traditional functional programming puts most of the domain-specific logic near the heart of the program, meaning that to change or swap out any of it, you’re going to have to touch the code in many places. When you invert that control model, you end up with relatively simple code running at the heart of it that mostly is there to pass messages between dependencies that now contain most of the specific logic broken into distinct chunks based on what it does.

Now that we’ve been covering such high level topics, how about an example?

Traditional Way DIP/IoC way
class FileStore {
public void Open(string filename)
    { ... }
public Record Read() 
    {...}
public void Write(Record row) 
    { .. }
public void Close()
    { ... }
}
interface IRecordStore {
    IRecord Read();
    void Write(IRecord row);
}

class FileRecordStore:IRecordStore
class DBRecordStore:IRecordStore
class TapeRecordStore:IRecordStore


In our example, the traditional way if we forgot to call open when we started or close when finished, it could cause major problems. Also if we decide we want it to write to a database or tape drive instead, you’ll have to rewrite a lot of places.

While DIP and IOC form a nice abstract pattern for us to aspire to. Dependency Injection helps answer the “how does this actually work”. Dependency Injection (DI) helps solve the problem of how to interconnect the different objects while still giving enough flexibility to build tests that work at the unit level. To do so, it separates the concerns (or actions) of creating instances and using them. Using our Record storage example, perhaps you have a Table object that needs to pull it’s data via the IRecordStore’s methods. If you hard-code a creation of a FileRecordStore or DatabaseRecordStore anywhere in the Table object then suddenly you’ve lost the ability to easily swap it out for testing or for a different Record Store. This will mean for all your work, the two classes have become tightly coupled again. Instead, what you need is a mechanism to create, then pass these dependencies down to the other objects who will actually use them. This neatly brings us to the 3 methods Dependency Injection use to accomplish this:

  • Constructor Injection
    This method passes the dependent to the parent as the parent is constructed. It doesn’t care where they were created because that is outside it’s concerns. This is the most common way of doing it, especially in cases where an object cannot function without it’s dependencies. A constructor example:
    public TableClass(IRecordStore dataStore)
  • Setter or Property Injection
    This method a property or set function to set the object’s internal instance of a dependency to whatever is passed to it. This is common in cases where the dependency in question is expensive to create and thus you don’t want to create them before they are needed.
    public void SetRecordStore(IRecordStore dataStore)
    This makes it possible to create and try to use an object before all it’s dependent’s are created. This is a real disadvantage as it requires additional error checking code to verify that objects were set before they were accessed internally.
  • Method Injection
    Sometimes the object doesn’t need to maintain an internal reference to a dependency, either because it’s only used in a single method or because the implementation of the dependency can change quickly based on outside requirements. In this case you can pass the dependent directly to the function that uses it as an additional argument
    public void WriteAllRows(IRecordStore dataStore)

Now if you’re like me, you might immediately see how useful this is but get hung up on a rather important detail: What creates these dependencies? At some point in here, something has to create it, and that something has to be able to decide which of the specific implementations to create. In a more complex system where there might be dozens of these that’s a lot of objects to be throwing references around via one of the 3 methods above. Especially if you need them several levels down in the hierarchy, passing them through every object in between looks as clunky as it sounds. This is where Dependency Injection libraries take over the load, and yes we’re going to cover that as well. That however is a post that even paired down to what you need to get a good start, is too long for today. So tune in later, for part 2 of this post where we will talk about a Microsoft library that helps answer those remaining questions.

One week in…

It’s been a whirlwind of a few weeks already but we’ll limit ourselves to the part that’s related to SSI instead of the grand adventure of helping my previous job move locations along with other major tasks immediately before starting a new job.

The week started out with me cramming books, of which Clean Code and Test Driven Development are the most interesting thus far. Over the years I’ve participated in a variety of projects with often at most a team of two, so between that and just the difference of our environment, by the standards of these books I’ve spent most of my professional life Doing It Wrong. Let’s jump right into some reflections based on the specific books

I had intended to read Test Driven Development after Clean Code, the thinking being I knew I was looking forward to TDD because I’d heard about it for years and never been in a position where I had enough time to implement it (or was working on a LAMP environment that wasn’t object oriented enough to make testing as clear cut). However by about ten pages in, after the 5th reference in Clean Code to TDD, I reversed their order. I won’t copy & paste stuff but it was as interesting of a read as I expected, the first section the examples flowed fairly clearly, each basic decision making sense in the context. The second half I had to work a little harder, in my reading I had missed a block explaining why he started down a different path than the obvious one to me which caused me great confusion until I went back and found the section and reread it. As I’ve been working on the Tic-Tac-Toe project I’ve been struggling with a bit of it along the way. A couple times I’ve found myself trying to code tests at too high of a level, I’m also still struggling with writing the test before the code on some of the more complex implementations where I’m struggling to visualize the test without adding some additional elements to the objects. Aaron suggested I dig into the Moq documentation before I get too much further along and I can see the usefulness of mock objects. Honestly I’m struggling with the nuts and bolts conceptually; how do I secretly replace the objects with their testing counterparts without exposing a vital private objects (representing the board and players) to the public unnecessarily? I find myself wondering if my paralysis on the next test is a result of newness to testing or that the object I’m trying to test is doing too complex a thing and needs to be broken up.

Confession time, I could have continued to ramble on about the testing probably for quite a while, but as I’m watching my word count to make sure this doesn’t get long, I think that’s a good stopping point because my internal monologue on that last bit has easily broken 800 words by itself. So on to the other book I found interesting, Clean Code.

Clean Code actually went into a lot more than I thought from the title, glancing at it I found myself wondering how a book that thick could come out of a discussion what I defined as “clean” code (my definition of which revolved mostly around consistent formatting for readability, so it was pretty lacking). I confess, my last project in C#, though a lot of fun due to unusual challenges, was still somewhat thrown together, having grown from a weird proof of concept into something that was intended for deployment. As it was fresh on my mind, I spent a lot of time going “yep I didn’t do this right either” as I read through Clean Code. My original idea for this blog post was actually going to revolve around that with the title “Thing’s Aaron’s done wrong”. The worst of which would probably be my violations of the Single Responsibility Principle. Iterating an entire hard drive via Windows API calls already isn’t the prettiest thing, but I failed to isolate it and as a result 70% of the logic of the entire system was in one class. I ended up at one point actually dumping most of the code and rewriting at one point after I started expanding it past the test case, but I largely repeated the same errors when I did it. I expect this one will be one I come back to regularly when I hit questions like I’m hitting on the Tic-Tac-Toe one at the moment.

This brings us neatly to where I am right this minute, so it’s as good of place to stop as any. Next post? Hopefully about how the solution to what I am grappling with was actually super easy, I was just overthinking it or hadn’t applied some design pattern fully.